In this article we are going to install 6 new plugins including:
- Status bar
- Icons
- Indentation lines
- Color check
- Autopairs Neovim version written in Lua that does not pair when there is a character in front.
- Character exchange
If you haven’t seen the previous episodes, follow the links:
- All about Neovim with Lua - How to Customize from Zero
- From init.vim to init.lua - Everything about Neovim with Lua
- Installing Plugins - Everything about Neovim with Lua
Installing icons
Before anything else make sure you have the Terminal Root icons installed, the repository address is: https://github.com/terroo/fonts, use the fonts branch.
Once we have the fonts we will install the icons to use when installing the Status Bar. We will use Nvim-web-devicons.
To do this, just add the line below to your lua/plugins/plugins.lua:
use 'kyazdani42/nvim-web-devicons'Then just run:
:PackerInstall
Now create a file inside the directory and name: ~/.config/nvim/lua/plugins/utils.lua and insert this content:
-- For nvim-web-devicons
require'nvim-web-devicons'.get_icons()
We won’t see the effect of this yet, only when installing the next step plugin!
Installing Status Bar
The status bar that I use and find it very cool is staline.nvim it is very light and written in Lua, besides having several cool themes . To install, we already know in plugins.lua:
use 'tamton-aquib/staline.nvim'And then: :PackerInstall .
Let’s use that function concept we saw, so add this to the end of the settings.lua file:
vim.cmd([[ let extension = expand('%:e') ]])I use this variable for a code I created for my Status Bar.
Now let’s go back to the utils.lua file and add this code which is in keeping with its theme that I use:
Note that I’m using
require("lfs"), I use it because it’s easier to check if a directory exists, it’s Lua File System , a module that requires installation if you don’t have it, use your system’s package manager or LuaRocks to install it, but try first if there isn’t one critical is because it is already installed.
-- To Status Bar
require("lfs")
local function dot_git_exists()
local path = "./.git"
if (lfs.attributes(path, "mode") == "directory") then
return true
end
return false
end
if dot_git_exists() then
branch = '-branch'
else
branch = '-📁'
--branch = '- '
end
local function get_var(my_var_name)
return vim.api.nvim_get_var(my_var_name)
end
extension = get_var("extension")
if extension == "cpp" or extension == "hpp" or extension == "h" then
this_lsp = '-lsp_name'
else
this_lsp = '-file_size'
end
require('staline').setup{
sections = {
left = {
' ', 'right_sep_double', '-mode', 'left_sep_double', ' ',
'right_sep', '-file_name', 'left_sep', ' ',
'right_sep_double', branch, 'left_sep_double', ' ',
},
mid = {'-lsp'},
right= {
'right_sep', '-cool_symbol', 'left_sep', ' ',
'right_sep', '- ', this_lsp, '- ', 'left_sep',
'right_sep_double', '-line_column', 'left_sep_double', ' ',
}
},
defaults={
fg = "#f7f7f7",
cool_symbol = " ",
left_separator = "",
right_separator = "",
line_column = "%l:%c [%L]",
true_colors = false,
line_column = "[%l:%c] 並%p%% ",
stab_start = "",
stab_end = ""
--font_active = "bold"
},
mode_colors = {
n = "#921F81",
i = "#006A6B",
ic = "#E4BF7B",
c = "#2a6099",
v = "#D71B39"
}
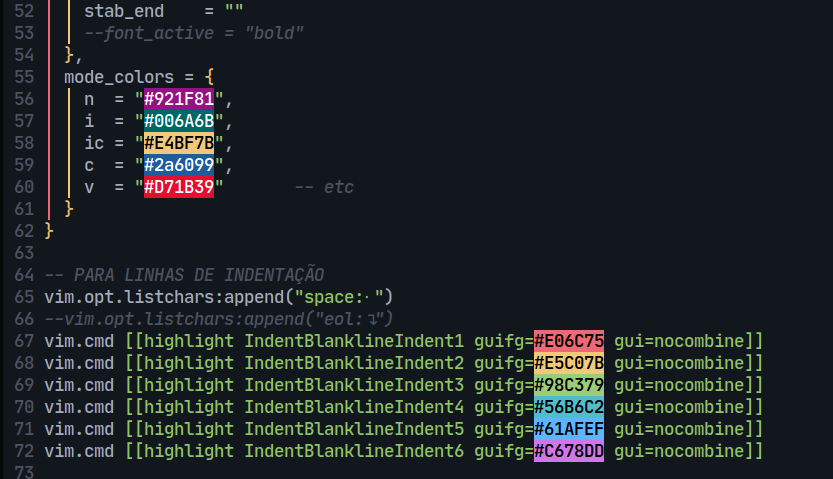
}Colors are in
mode_colors, change to the colors you want (n for Normal mode, i for Insert and so on).
If you want your distro icon to appear, download this file run it with lua systems-icons.lua and see if your distro/system icon appears on the terminal. Copy and replace the Gentoo(cool_symbol) icon with what you want!
Another thing is that I only use LSP for C++, however later we’ll detail LSP, then you can change it as you wish, rest assured!
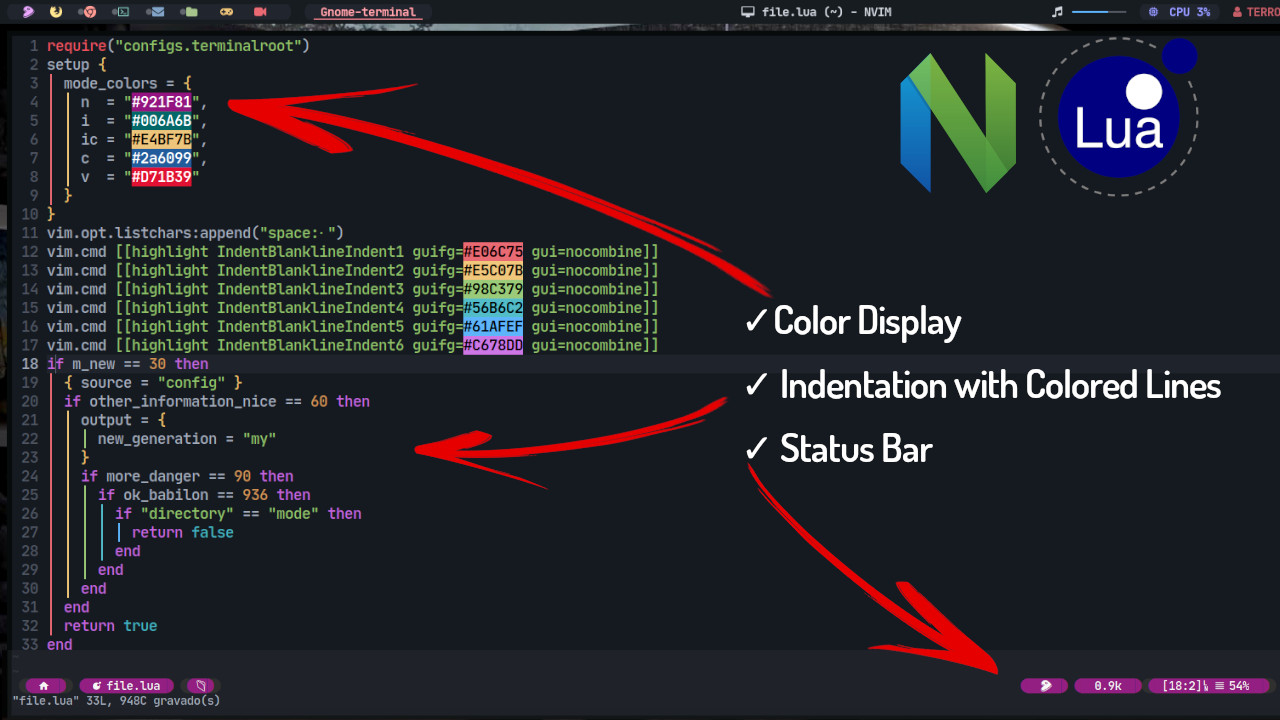
The result of the Status Bar should look similar to this:

If you want a different theme see the procedure in the repository
Indentation Line
A really cool feature in an IDE is the fact that it has lines that determine where code indentation starts and ends. And a plugin that does this extraordinarily is indent-blankline.nvim
We added to plugins.lua and installed:
use 'lukas-reineke/indent-blankline.nvim'
-- :PackerInstall
After installing and using :PackerCompile (which in our case is automatic, as we did) it already works! Open any file and note that the indentation lines already exist.
You can create new files for each plugin with the same name as the plugin (that’s how I do it), but here we’ll add the settings to lua/plugins/utils.lua to centralize the information.
If you want the indented lines to be colored, add this to your utils.lua
-- FOR THE INDENTATION LINES

vim.opt.listchars:append("space:⋅")
--vim.opt.listchars:append("eol:↴")
vim.cmd [[highlight IndentBlanklineIndent1 guifg=#E06C75 gui=nocombine]]
vim.cmd [[highlight IndentBlanklineIndent2 guifg=#E5C07B gui=nocombine]]
vim.cmd [[highlight IndentBlanklineIndent3 guifg=#98C379 gui=nocombine]]
vim.cmd [[highlight IndentBlanklineIndent4 guifg=#56B6C2 gui=nocombine]]
vim.cmd [[highlight IndentBlanklineIndent5 guifg=#61AFEF gui=nocombine]]
vim.cmd [[highlight IndentBlanklineIndent6 guifg=#C678DD gui=nocombine]]

vim.cmd([[
  hi! MatchParen cterm=NONE,bold gui=NONE,bold guibg=NONE guifg=#FFFFFF
  let g:indentLine_fileTypeExclude = ['dashboard']
]])


require("indent_blankline").setup {
    show_end_off_line = true,
    space_char_blankline = " ",
    char_highlight_list = {
        "IndentBlanklineIndent1",
        "IndentBlanklineIndent2",
        "IndentBlanklineIndent3",
        "IndentBlanklineIndent4",
        "IndentBlanklineIndent5",
        "IndentBlanklineIndent6",
    },
}
The result will be this:

For more information see the repository .
Displaying colors when typed
When working with colors, it is interesting to type the name or code of the hexadecimal or RGB color and then display it so that we know what color it is and how it will be displayed. For example: #554477 .
For this we will use nvim-colorizer.lua
use 'nvim-colorizer.lua'
--PackerInstall
And in utils.lua just import it and call the setup function to load it:
Add this line:
-- FOR THE COLORIZER
require'colorizer'.setup()
Now the colors typed into your Neovim will appear like this:
Extra plugins
To finish this episode I recommend two plugins that we talk about them in this video .
Which is Vim Surround, to create or replace characters around a word, very useful for those who frequently write in Markdown and Nvim Autopairs , it is superior to Vim Autopairs, because if there is a character in front it does not add.
Just install them.
use 'tpope/vim-surround'
use 'windwp/nvim-autopairs'
-- PackerInstall
Surround is automatically available after installing, Nvim Autopairs needs to add this code to its utils.lua:
– FOR AUTOPAIRS
require('nvim-autopairs').setup({
  enable_check_bracket_line = false
})
For more information about these plugins see their repository.