Overview
Just like you use CMake (creating a CMakeLists.txt file) to generate the Makefile file and then use the make command.
Although you can also use CMake for Ninja too.
You use Meson (creating the meson.ninja file) to generate the ninja.build file and then use the ninja command.
But how to do that?
How to compile programs with Ninja

Ninja is a small build system with a focus on speed. In essence, Ninja is an alternative to Make. Ninja is used by several projects, having as its main client Google Chrome and Android, and is used by most developers working on LLVM.
Unlike Make, a “build generator” must be used to generate Ninja build files. Gyp, CMake, Meson and gn are popular build management software tools that support the creation of build files for Ninja.
The process is very similar to that of Make.
Compiling in C, single file:
Assuming you have this code (Hello, World!) in C: vim main.c. In this example we use the command [gcc]https://en.terminalroot.com.br/gnu-autotools-ultimate-tutorial-for-beginners/) to compile a single file, but below, see multiple files in C++, which only changes the command and the number of files.
#include<stdio.h>

int main(int argc, char **argv) {
  printf("Hello, World!\n");
  return 0;
}
To compile with Ninja, you will need to create a ** build.ninja ** file with the following content: vim build.ninja
rule cc
  command = gcc -c -o $out $in
  description = CC $out

rule link
  command = gcc -o $out $in
  description = LINK $out

build src.o: cc main.c
build demo-c: link src.o
Analyzing the file above, according to previous knowledge about Make, for example, we noticed that the file that will be compiled we define as: main.c, the temporary file we call src.o and the final binary file we name demo-c.
Now, just be in the directory you saved and via the command line run:
ninjaAnd then just run the program:
./demo-c
There are several options such as cleaning the temporary file(s) and among other options, for more details visit the manual.
Compiling in C++, multiple files:
For this example we will use Dec2Bin, a mini program that converts decimal to binary in C++. In this example we use the command g++ to compile multiple files. There are 3 files, of which 1 is just a .hpp library:
vim main.cpp
#include <iostream>
#include <string>
#include "dectobin.hpp"

int main( int argc , char** argv ) {
  Dectobin db;
  std::cout << ( argc > 1 ? db.dtob( argv[1] ) : db.get_m_help() ) << "\n";
  return 0;
}
vim dectobin.hpp
#ifndef DEC_TO_BIN_H
#define DEC_TO_BIN_H
class Dectobin{
    public:
        std::string dtob( char * num );
        void set_m_help();
        std::string get_m_help();

    private:
        const static int m_max{20};
        int m_number;
        int m_modules[ m_max ];
        int m_i;
        std::string m_output;
        std::string m_help;
};
#endif
vim dectobin.cpp
#include <iostream>
#include <string>
#include "dectobin.hpp"

std::string Dectobin::dtob( char * num ){
      m_number = std::stoi( num );
      if ( m_number == 0 ) {
        m_output = "0";
      }else{
        for (m_i = 0; m_number > 0; m_i++) {
          m_modules[m_i] = m_number % 2;
          m_number = m_number / 2;
        }
        for (m_i = m_i - 1; m_i >= 0; m_i--) {
          m_output += std::to_string( m_modules[m_i] );
        }
      }
    return m_output;
}

void Dectobin::set_m_help(){
    m_help = "Enter a number.";
}

std::string Dectobin::get_m_help(){
    set_m_help();
    return m_help;
}
We saved the files inside the dec2bin directory:
cd dec2bin/
ls
dectobin.cpp dectobin.hpp main.cpp
In the same way as the previous one, we will create a file build.ninja, only with the following settings:
rule cc
  command = g++ -c -o $out $in
  description = CC $out

rule link
  command = g++ -o $out $in
  description = LINK $out

build source1.o: cc main.cpp
build source2.o: cc dectobin.cpp
build program-cpp: link source1.o source2.o
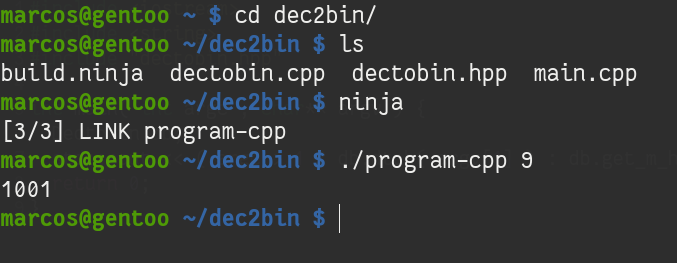
Then just run the ninja command and the program-cpp file will be ready in the same directory. See the output in the image below where we used the program to convert the decimal number: 9 to binary: 1001:

How to Compile Programs with Meson Build

Meson is a software tool to automate the construction (compilation) of software. He is a front-end for Ninja. Meson is free and open source software written in Python, under the Apache License 2.0.
Meson supports the languages C, C++, CUDA, D, Objective-C, Fortran, Java, C#, Rust and Vala, and has a mechanism for handling dependencies called Wrap.
Meson supports GNU Compiler Collection, Clang, Microsoft Visual Studio and others.
How to compile a program with Meson
For a simple way of understanding, let’s create an example for a program Hello, World! in C++. Assuming you have the following file:
#include <iostream>

int main(){
    std::cout << "Hello, World! Meson Build!" << '\n';
    return 0;
}
In the same directory as your code file/project you should create a file named meson.build: vim meson.build
project('tutorial', 'cpp')
executable('demo', 'main.cpp')
Let’s create the file: tutorial, the language is cpp(C++), the final binary file will have the name: demo and the file we are going to compile is main.cpp.
Once this is done, the next step is to run the command:
meson builddir
The output will look like this:
marcos@gentoo ~$ meson builddir
The Meson build system
Version: 0.53.1
Source dir: /home/marcos/teste-meson-ninja
Build dir: /home/marcos/teste-meson-ninja/builddir
Build type: native build
Project name: tutorial
Project version: undefined
C++ compiler for the host machine: c++ (gcc 9.2.0 "c++ (Gentoo 9.2.0-r2 p3) 9.2.0")
C++ linker for the host machine: c++ GNU ld.bfd 2.33.1
Host machine cpu family: x86_64
Host machine cpu: x86_64
Build targets in project: 1

Found ninja-1.9.0.git.kitware.dyndep-1.jobserver-1 at /usr/bin/ninja
marcos@gentoo ~$
It will create a directory with the name builddir and we need to enter it to make the build:
cd builddir
ninja
After that just run the generated executable file:
./demo
Hello, World! Meson Build!
For more information and details see the official documentation.
Simple, right? Thanks!


