
We have already shown here a Definitive Tutorial for GNU Autotools for Beginners as well as another tutorial also on How to Create a Makefile.
But CMake has been widely adopted by the community/companies due to the fact that it is multiplatform and because it is very easy to use.
Introduction
CMake is a multiplatform system for performing automated generation. It is comparable with the Unix Make program in which the generation process is, in the end, controlled by the configuration files , in the case of CMake called CMakeLists.txt files.
Unlike Make, it does not directly generate the final software, but instead generates standard generation files (for example, Unix makefiles and Visual C++ projects/workspaces on Windows) which are used in common ways.
This allows developers familiar with a particular development environment (such as the various IDEs) to use it in standard mode. It is this use of the native generation environment that distinguishes CMake from other better known systems like SCons.
The name “CMake” is an abbreviation for “cross platform make”.
Installation
To install CMake use your distribution’s package manager, examples:
Remembering that you also need to have a compiler installed, example: gcc/g++
sudo apt install cmake # Debian, Ubuntu, Linux Mint,...
sudo dnf install cmake # Fedora
sudo pacman -S cmake # Arch Linux, Manjaro,...
On Gentoo, Funtoo and the like, you don’t need to install it, since CMake is already native to these systems.
Basic example
Assuming you have the following file:
Example of building a C++ code
// main.cpp
#include <iostream>
int main(int argc, char** argv){
    std::cout << "Example for testing with CMake" << std::endl;
    return 0;
}
Of course you could compile with the GCC, the GNU Compiler Collection by running the command: g++ main.cpp -o myexample.
However, to use CMake you first need to create a file named: ** CMakeLists.txt **: vim CMakeLists.txt (necessary to write in this way, respecting the lowercase and uppercase letters).
Within this file (for this basic example, which even works for larger projects) you will need to include 3 lines:
- The first line will tell you the version of your CMake:
cmake_minimum_required(VERSION 3.10), check the version you have to inform it or even a lower version:cmake --version. - In the second line you must enter the name of your project, example:
project(MyExample) - And in the third line enter the name of the final binary and the file:
add_executable(myexample main.cpp)(if there is more than one file, example if it were directly from g++:
g++ main.cpp other.cpp -o binary), in CMakeLists it would be:add_executable (binary main.cpp other.cpp), as well as directly the compiler does not need to inform the libraries (.h e .hh), as they are already part of includes, unless it is not.
// CMakeLists.txt
cmake_minimum_required(VERSION 3.10)
project(MyExample)
add_executable (myexample main.cpp)
After that, just create a directory and the CMake files will remain and execute the command cmake:
Create a separate directory to keep everything organized and then run cmake pointing to the directory immediately preceding “..”
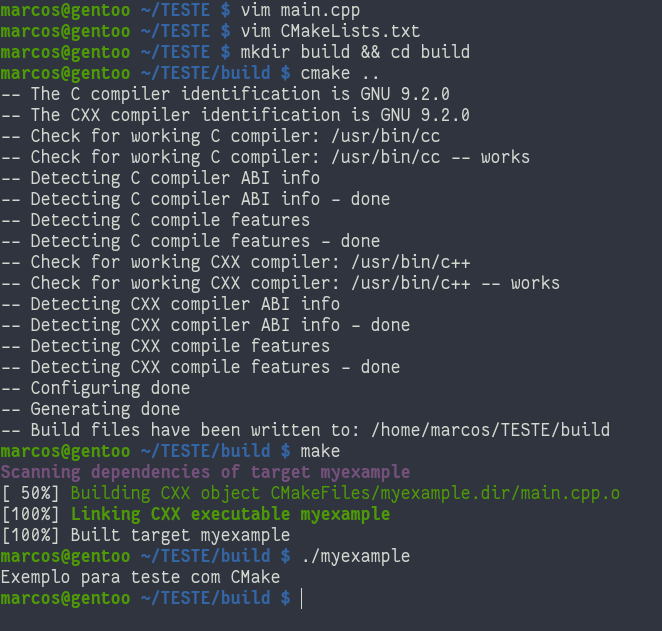
mkdir build && cd build
cmake ..
This generated several CMake verification files and also the Makefile, now just compile and test the final binary:
make
./myexample
The output will be similar to the image below:
More information
There are more things you can do within CMakeLists.txt, such as: project version control, binaries, conditions and more, but in summary it comes down to that demonstrated here.
If you are interested in learning more, I recommend you to read CMake’s own tutorial clicking here