In the future, I intend to bring more content about OpenGL and Vulkan, however, one of the best tools to “prepare” for these upcoming realities is SFML.
By the way, SFML is also interesting to enter the world of game and graphics development, besides you getting to better understand other libraries, such as: SDL2, Raylib, Allegro, besides also facilitating the learning of graphics engines such as: Godot, Unity and among others.
And one of the interesting tools of SFML, to use, is sf::Vertex.
sf::Vertex is a class (or more precisely, a struct) in SFML that represents a single vertex in 2D space and stores information such as:
- position;
- color;
- and texture coordinates.
01. The Basics of the Basics
Starting from scratch to understand how sf::Vertex really works.
- 1.1. This only shows the black background, but note that in
drawit is necessary to pass 3 parameters, in addition to&vertexas a reference, since it is not drawable.
...
sf::Vertex vertex;
...
window.draw(&vertex, 1, sf::Points);
...
Note that we used the model: sf::Points, it only draws a single point. There are other models, we will see later. > It is appearing on the screen, however, at position: 0, 0, that is, you will not be able to notice it.
- 1.2. To notice it, position it further to the right and down. To do this, use the union structure:
.position, example:
vertex.position = sf::Vector2f(100.f, 100.f);Note that a small white dot (1 single vertex) will appear on the screen!

This basic example could be replaced using only the constructor:
sf::Vertex vertex(sf::Vector2f(100.f, 100.f)); - 1.3. You can also set color for the vertex using the union structure
.color
vertex.color = sf::Color::Red;
// Or directly in the constructor:
sf::Vertex vertex(sf::Vector2f(100.f, 100.f), sf::Color::Red);- 1.4. You noticed that the constructor is overloaded like most declarations in SFML. And there is one more argument for the constructor which is the union structure:
.texCoords.
As the name suggests, it is used to define coordinates for a possible textture that you want to “fit” to your vertex. In addition to being able to pass it directly in the constructor, you can also define it later:
vertex.textCoords = sf::Vector2f(0.f, 0.f);Drawing just one vertex may be useful, depending on what you are doing, but it is generally not useful in most cases. In the next topic we will see how to use multiple vertex(s).
02. Multiple vertex(s)
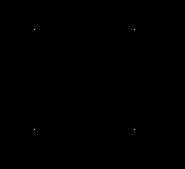
The correct way to use vertex is together. In this example we will place one at each point of a possible square:
sf::Vertex vertex[4] = {
  sf::Vertex(sf::Vector2f(100.f, 100.f), sf::Vector2f(0.f, 0.f)), // Top-left
  sf::Vertex(sf::Vector2f(200.f, 100.f), sf::Vector2f(100.f, 0.f)), // Top-right
  sf::Vertex(sf::Vector2f(200.f, 200.f), sf::Vector2f(100.f, 100.f)), // Bottom-right
  sf::Vertex(sf::Vector2f(100.f, 200.f), sf::Vector2f( 0.f, 100.f)) // Bottom-left
};
And now, since it is not a single vertex but 4, we no longer use reference to draw:
window.draw(vertex, 4, sf::Points);It will render like this:
Models for sf::Vertex
We use and talk about sf::Points, logically, it only draws points, but there are others. They are:
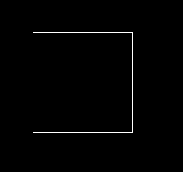
sf::Lines, it connects the points that are on the same line:

sf::LineStrip, similar tosf::Lines, but it makes an additional connection on one of the verticals:
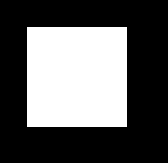
sf::Quads, it fills the content taking the vertices as coordinates:
sf::Triangles, similar tosf::Quads, but it is for triangles, of course your array needs to have 3 elements now:sf::Vertex vertex[3]:
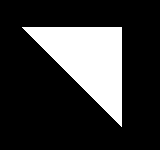
sf::TriangleStrip, we return to the 4 elements for the array, and notice that it fills, except for a triangle shape:

sf::TriangleFan, ends at the same vertex as the beginning, generating an effect similar tosf::Quadswith fill:Now there is a vertex with 5 vertices:
...
sf::Vertex vertex[5] = {
    sf::Vertex(sf::Vector2f(150, 150)), // start
    sf::Vertex(sf::Vector2f(100, 100)),
    sf::Vertex(sf::Vector2f(150, 100)),
    sf::Vertex(sf::Vector2f(200, 100)),
    sf::Vertex(sf::Vector2f(150, 150)) // end
};
...
window.draw(vertex, 5, sf::TriangleFan);
...
Examples
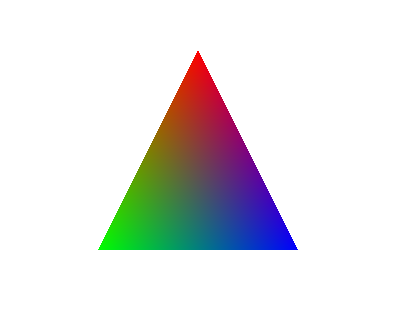
01. Drawing colored triangle like the basic example of OpenGL
...
sf::Vertex vertex[3] = {
sf::Vertex(sf::Vector2f(400.f, 100.f), sf::Color::Red), // Top (red)
sf::Vertex(sf::Vector2f(300.f, 300.f), sf::Color::Green), // Left (green)
sf::Vertex(sf::Vector2f(500.f, 300.f), sf::Color::Blue) // Right (blue)
};
...
window.clear(sf::Color::White);
window.draw(vertex, 3, sf::Triangles);
... 
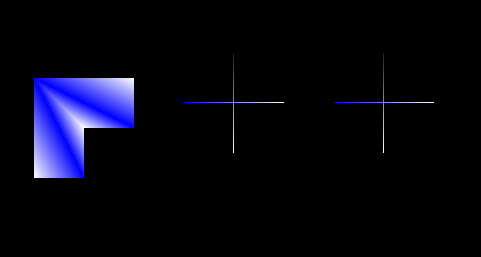
02. Creating an “almost” C++
#include <SFML/Graphics.hpp>

int main() {
  sf::RenderWindow window(
    sf::VideoMode(800, 450),
    "C++ sf::Vertex",
    sf::Style::Titlebar | sf::Style::Close
  );

  sf::Vertex cPlusPlus[15];

  // "C"
  cPlusPlus[0] = sf::Vertex(sf::Vector2f(100.f, 200.f), sf::Color::Blue);
  cPlusPlus[1] = sf::Vertex(sf::Vector2f(200.f, 200.f), sf::Color::White);
  cPlusPlus[2] = sf::Vertex(sf::Vector2f(200.f, 250.f), sf::Color::Blue);
  cPlusPlus[3] = sf::Vertex(sf::Vector2f(150.f, 250.f), sf::Color::White);
  cPlusPlus[4] = sf::Vertex(sf::Vector2f(150.f, 300.f), sf::Color::Blue);
  cPlusPlus[5] = sf::Vertex(sf::Vector2f(100.f, 300.f), sf::Color::White);
  cPlusPlus[6] = sf::Vertex(sf::Vector2f(100.f, 200.f), sf::Color::Blue);

  // 1º "+"
  cPlusPlus[7] = sf::Vertex(sf::Vector2f(250.f, 225.f), sf::Color::Blue);
  cPlusPlus[8] = sf::Vertex(sf::Vector2f(350.f, 225.f), sf::Color::White);
  cPlusPlus[9] = sf::Vertex(sf::Vector2f(300.f, 175.f), sf::Color::Blue);
  cPlusPlus[10] = sf::Vertex(sf::Vector2f(300.f, 275.f), sf::Color::White);

  // 2º "+"
  cPlusPlus[11] = sf::Vertex(sf::Vector2f(400.f, 225.f), sf::Color::Blue);
  cPlusPlus[12] = sf::Vertex(sf::Vector2f(500.f, 225.f), sf::Color::White);
  cPlusPlus[13] = sf::Vertex(sf::Vector2f(450.f, 175.f), sf::Color::Blue);
  cPlusPlus[14] = sf::Vertex(sf::Vector2f(450.f, 275.f), sf::Color::White);

  while (window.isOpen()) {
    sf::Event event;
    while (window.pollEvent(event)) {
      if (event.type == sf::Event::Closed)
        window.close();
    }
    window.clear(sf::Color::Black);
    window.draw(cPlusPlus, 7, sf::TriangleFan);
    window.draw(&cPlusPlus[7], 4, sf::Lines);
    window.draw(&cPlusPlus[11], 4, sf::Lines);
    window.display();
  }
  return 0;
}
There is another type that is also widely used, which is sf::VertexArray, it makes it easier to use and implement, not to mention that it is drawable, for example:
...
sf::VertexArray lines(sf::LinesStrip, 5);
lines[0].position = sf::Vector2f(100.f, 100.f);
lines[1].position = sf::Vector2f(200.f, 100.f);
lines[2].position = sf::Vector2f(200.f, 200.f);
lines[3].position = sf::Vector2f(100.f, 200.f);
lines[4].position = sf::Vector2f(100.f, 100.f);
...
window.draw(lines);
...
This renders a square of lines with no fill. In this video we create a gradient background with
sf::VertexArray.
For more information, visit: https://www.sfml-dev.org/tutorials/2.5/graphics-vertex-array.php.