Introduction
Docker is a container virtualization environment that can establish development or runtime environments without modifying the base operating system environment. It has the ability to deploy container instances that provide virtualization using the host kernel, which makes it faster and lighter than full hardware virtualization. Versions
- Docker.io - Older versions of Docker were called docker-engine or docker.io. The docker-io package was the name used in Debian / Ubuntu. That reference no longer exists.
- Docker CE - It is the free version of Docker that stands for Docker Community Edition.
- Docker EE - It is the paid version of Docker and has more features. It means Docker Entreprise Edition.
Containers that produce Kernel Panic will induce Kernel Panic in the host’s operating system.
Installation
To install we will use the snap. Just remembering that the snap is available for several distributions, such as: Arch, Gentoo, Linux Mint and others. The cool thing about it is that we will avoid problems with Docker versions.
sudo snap install docker- Installs Dockerps -A | grep docker- Check if the daemon is already runningsudo docker run hello-world- Running your first container
The output will be something like:
sudo docker run hello-world

Unable to find image 'hello-world:latest' locally
latest: Pulling from library/hello-world
1b930d010525: Pull complete
Digest: sha256:41a65640635299bab090f783209c1e3a3f11934cf7756b09cb2f1e02147c6ed8
Status: Downloaded newer image for hello-world:latest

Hello from Docker!
This message shows that your installation appears to be working correctly.

To generate this message, Docker took the following steps:
 1. The Docker client contacted the Docker daemon.
 2. The Docker daemon pulled the "hello-world" image from the Docker Hub.
    (amd64)
 3. The Docker daemon created a new container from that image which runs the
    executable that produces the output you are currently reading.
 4. The Docker daemon streamed that output to the Docker client, which sent it
    to your terminal.

To try something more ambitious, you can run an Ubuntu container with:
 $ docker run -it ubuntu bash

Share images, automate workflows, and more with a free Docker ID:
 https://hub.docker.com/

For more examples and ideas, visit:
 https://docs.docker.com/get-started/
Running Docker without sudo
-
- Check which groups are available on your system, run the command:
cat /etc/group | cut -d: -f1(to display groups beside:cat /etc/group | cut -d: -f1 | tr '\ n' '' && echo), if among the groups listed is docker, then that group exists, if you want to run a command that tells you whether or not the group exists, network the command:[[ $(grep 'docker' /etc/group) ]] && echo 'There is the docker group' || echo 'There is no docker group'
- Check which groups are available on your system, run the command:
-
- Use this step only if the docker group does not exist. Then create the group with the command:
sudo groupadd docker.
- Use this step only if the docker group does not exist. Then create the group with the command:
-
- Now add your user to the docker group with the command:
sudo usermod -aG docker $USER(orsudo gpasswd -a $USER docker) and make sure you are now in the group with thegroups $USERcommand.
- Now add your user to the docker group with the command:
If you want to remove the user from the group, run:
sudo gpasswd -d $ USER docker
-
- Now you need to restart your computer for the changes to take effect. And after restarting the test without the
sudo docker run hello-world, if it runs it is all right.
- Now you need to restart your computer for the changes to take effect. And after restarting the test without the
Running a container
For this example we will use a Shell Script application: ZZ functions
First, download the container image to your machine:
If you aren’t part of the docker group as mentioned above, use
sudofor all the following steps.
docker pull funcoeszz/zzThe output will be something like:
docker pull funcoeszz/zz
Using default tag: latest
latest: Pulling from funcoeszz/zz
386a066cd84a: Pull complete
4e1412bf2f54: Pull complete
9e64dc8a144a: Pull complete
4efdf586deec: Pull complete
856d94476b10: Pull complete
Digest: sha256:23a5e20ceeb907e39652c4b130d5a6a8d77bc25a4aeba003a66871ada88d07dc
Status: Downloaded newer image for funcoeszz/zz:latest
List the images that are already on your machine:
docker imagesNow just run the container and inform which function you want to use, along with its parameters, example: docker run --rm funcoeszz/zz maiusculas is working
Output:
# --rm is optional
# docker run --rm funcoeszz/zz maiusculas is working
docker run funcoeszz/zz maiusculas is working
IS WORKING
Search for a container: docker search nginx
Commands for information: docker info and others, see: docker --help or docker only
Stopping and removing images and containers
The docker run command takes the Docker image as a model and produces a container from it.
- Listing images and containers:
docker imagesordocker image ls - Stopping containers:
docker stop $(docker ps -a -q) - Removing all containers:
docker rm $(docker ps -a -q) - Removing all images:
docker rmi $(docker images -a -q)ordocker rmi ID_IMAGE
Creating a container
- Create a directory and enter it:
mkdir myshell && cd myshell - Create a file named: Dockerfile:
vim Dockerfile
FROM ubuntu:19.04
ENV PATH=/app:$PATH
COPY myshell.sh /app/
WORKDIR /app
ENTRYPOINT ["./myshell.sh"]
Create shell script file: vim myshell.sh
#!/bin/bash
echo "Testing this app ... [OK]"
Or this case for example server, to play for background
#!/bin/bash
while true; do
    echo -en "Running my script, time is it: $(date +%H:%M:%S)\r\r"
done
- Execution permission:
chmod +x myshell.sh - Build the App image:
docker build --tag=myshell.
- Confirm the image:
docker image ls - Running the container:
docker run myshellContainer ID:
docker container ls
Uploading an image/container
- Create an account at: https://hub.docker.com/signup
- Confirm your email
- Log in: https://hub.docker.com/login
- At the root URL, create a repository: https://hub.docker.com/
[Create Repository +], style to create a repository on GitHub: name, description, public..create
- Logging in via the command line:
docker login, enter your username [ENTER] and then your password [ENTER] - Creating an Image Tag:
docker tag myshell terminalroot/myshell:v1or without tag:docker tag myshell terminalroot/myshell - Publishing:
docker push terminalroot/myshell: v1or if you did not enter a tag:docker push terminalroot/myshell
If you want to test it, just remove all the images and containers and then pull it out at the beginning and see if it’s really working.
Removing Docker
- Stop all processes:
docker stop $(docker ps -a -q) - Removing processes:
docker rm $(docker ps -a -q) - List the images:
docker images - Removing all images:
docker rmi IMAGE_ID [nImage_ID ...] - See the groups and remove the docker group:
groups $USER
sudo groupdel docker
groups $USER
Listing the snaps and removing the snap:
snap list
sudo snap remove docker`
snap list
sudo snap refresh
More information: snap.
Bonus Tip
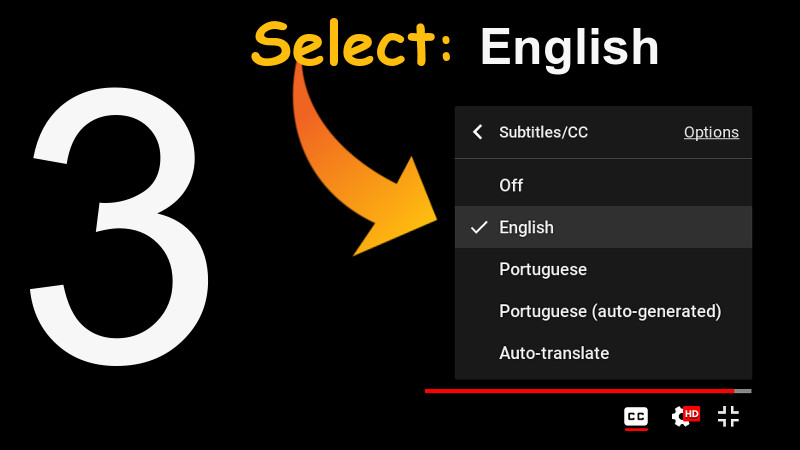
See all the tips worked in the video below. Remembering that the tutorial is in Portuguese, but you can use the subtitles
The video has English subtitles native to the video itself and with the correct translation. To enable, use the settings in the footer of the video itself, according to the images shown here below.
CLICK ON IMAGES TO VIEW INTO LARGER RESOLUTION.