
Introduction
Jekyll is a simple static website generator, with blog knowledge, for personal, project or organization websites. Written in Ruby and created by Tom Preston-Werner, co-founder of GitHub, it is distributed under the open source MIT license.
Jekyll is the mechanism behind the pages of GitHub, a feature of GitHub that allows users to host websites based on their GitHub repositories for free.
Installing RVM, Ruby and Gem
To install Jekyll you will first need Ruby installed on your system, for example, on Ubuntu, Debian, Mint and the like, you can use the package manager according to the official Ruby documentation, including for other distributions: https: / /www.ruby-lang.org/en/documentation/installation/.
Remembering that, as presented in the documentation, it will install several extra packages, including
rubygems-integrationfor thegemcommand which is a package manager for applications written in Ruby (RubyGems) and will also serve to install the Bundler, which is a dependency manager.
However, the documentation procedure is informed for general cases, but it also suggests specific cases: “… or third party tools (rbenv and RVM).” via https://www.ruby-lang.org/pt/downloads/. In other words, both rbenv and RVM are more suitable ways to avoid “headaches” related to permission problems, in addition to avoiding configuration problems. Jekyll’s settings “have been similar to the Stock Exchange, change constantly”, as it is a modern application and is still under development, so changes are in full swing =).
To make things simpler for everyone, in this tutorial we will use RVM (Ruby Version Manager).
This procedure is described at: https://rvm.io/rvm/install
- First make sure to remove everything that may already be installed on your system:
Applications that are not installed, APT will inform you that it does not exist, as well as, directories that do not exist
rmwill warn you that it does not exist, so do not panic :O
sudo apt remove ruby bundler jekyll --purge
rm -rf ~/.gem ~/.ruby ~/.rvm
sudo apt clean && sudo apt autoremove && sudo apt autoclean
After that it is also interesting to make sure that your system is updated with apt update && apt upgrade.
Extra tip: You can create a single command to update your system whenever you need to:
echo 'alias myupdate="sudo apt update && sudo apt uograde -y && sudo apt autoremove && sudo apt autoclean && sudo apt clean"' >> ~/.bashrc
source ~/.bashrc
myupdate
- Now let’s import the gpg key.
Always remember to get the key from the official address (https://rvm.io/rvm/install), as newer versions may have the key modified.
gpg --keyserver hkp://pool.sks-keyservers.net --recv-keys 409B6B1796C275462A1703113804BB82D39DC0E3 7D2BAF1CF37B13E2069D6956105BD0E739499BDB- And then, let’s install RVM together with Ruby
Install RVM stable with ruby:, according to the code lines procedure.
curl -sSL https://get.rvm.io | bash -s stable --ruby
During installation it will run the command: sudo apt --quiet --yes update, so you will need to enter your sudo password. Now it is necessary to wait, as this part can take a while (it will install dependencies and compile Ruby).
- Now, add RVM to
$PATHfor your user, adding the line:source $HOME/.rvm/scripts/rvmto your~/.bashrcand reread it, if you want just use the two commands below:
echo 'source $HOME/.rvm/scripts/rvm' >> ~/.bashrc
source ~/.bashrc
After that, check if everything is right, consulting the version of RVM: rvm --version. To see the version of existing Ruby packages, run: rvm list known and to see the RubyGems version, run: gem --version.
If everything returned correctly, then we are on the right track. Now we go to the Bundler and finally to Jekyll which is our goal here.
Installing the Bundler and Jekyll
Well, from now on everything will be easier. Now let’s visit the Jekyll website: https://jekyllrb.com/ and on the home page it already shows the procedure to install Jekyll:
Note, if we didn’t do the above procedure with RVM, in this part you would need to use the sudo gem, and that would give you even more headaches when installing Jekyll via gem, so DO NOT use
sudo.
gem install bundler jekyllNow let’s create a basic website and enter the directory of our website:
jekyll new my-website
# Wait for him to create all the files on the website
cd my-website
Now let’s see our website working in the browser, to do this run the command:
bundle exec jekyll serveTo see your website working, just go to the address: http://localhost:4000. It will have the basic theme of Jekyll and a simple post of Welcome to Jekyll!
To take the site down, simply return to the terminal and press Ctrl + C. It may be that he accuses the error of not finding the file favicon.ico, but it is because this is a simple example and he did not create/generate this icon for this simple website/blog.
In the next module we will change the Jekyll theme for the blog that we created with Bootstrap in the previous video, and that way we will always know how to implement our own HTML or third party themes to Jekyll.
And then how to host our website/blog for free on specific platforms such as Gitlab, Github, Netlify and others, as well as using your own domain for our address, how to easily create posts, Jekyll structure and several other tips.
Watch the video
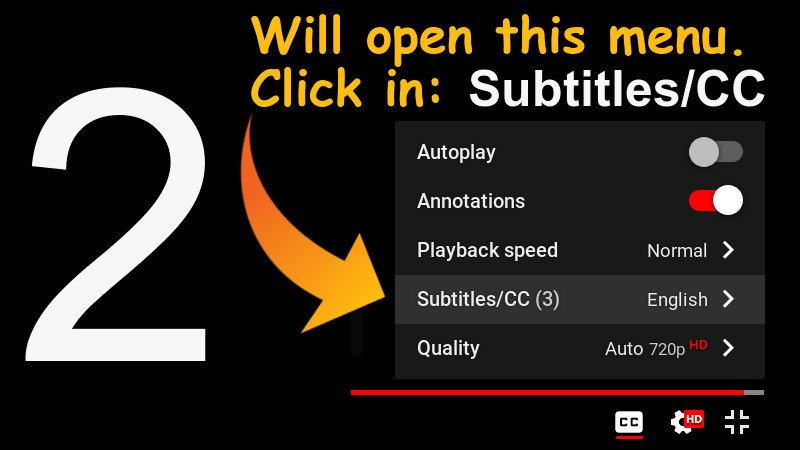
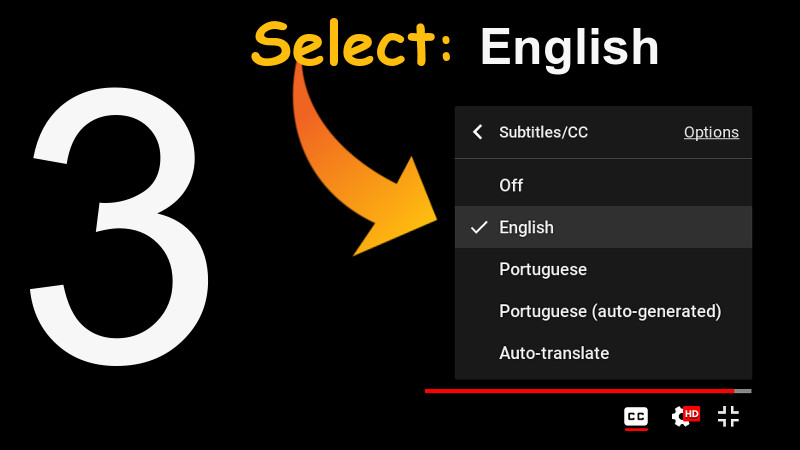
See all the tips worked in the video below. Remembering that the tutorial is in Portuguese, but you can use the subtitles
The video has English subtitles native to the video itself and with the correct translation. To enable, use the settings in the footer of the video itself, according to the images shown here below.
CLICK ON IMAGES TO VIEW INTO LARGER RESOLUTION.


Enjoy!
jekyll ruby bundler ubuntu linux