Introduction
The SDL2, natively, image formats png and jpg/jpeg are not supported, only ` bmp`.
However, there is an additional package made available by the SDL2 development team itself that allows you to use PNG and JPG in your games.
In this article we will see how to use these formats in SDL2 on Windows.
Dependencies
First, first of all, you must have GCC MinGW properly installed on your Windows, see the article below to see how to do this:
How to Install GCC/G++ MinGW on Windows
After properly installed on your system and working correctly, download SDL2 at this link, choose version SDL2-devel-X.XX.X -mingw.zip, where X.XX.X is the latest version number.
According to the publication date of this article, the latest version is 2.26.4, if you want to download it directly from here, just click the button below:
Once downloaded, right-click and select Extract here (needs Winrar installed).
I renamed the folder that was unzipped to SDL2 only, it’s easier when we use it.
Now cut or copy this folder to your project.
Using SDL2_image
Now let’s download the SDL2_image. Access this address: https://github.com/libsdl-org/SDL_image/releases/ and select the latest version of SDL2_image, according to the publication date of this article is 2.6.3 .
Download the package: SDL2_image-devel-X.X.X-mingw.zip, where X.X.X is the version, if you want the one according to this article click on the button below:
SDL2_image-devel-2.6.3-mingw.zip
Unzip the downloaded file (right mouse button: Extract here), enter the unzipped folder and copy the SDL_image.h file and paste it in the path corresponding to the SDL2 folder you have pasted in your project.
Its path would be: SDL2_image\x86_64-w64-mingw32\include\SDL2\SDL2_image.h and paste it in SDL2\x86_64-w64-mingw32\include\SDL2\, where there will be other files.
Do the same, but this time for ALL FILES in the bin and lib folder in SDL2_image and paste them in the corresponding paths in SDL2, example:
All files inside the bin folder: SDL2_image\x86_64-w64-mingw32\bin for ``SDL2\x86_64-w64-mingw32\bin`
All files inside the lib folder: SDL2_image\x86_64-w64-mingw32\lib for ``SDL2\x86_64-w64-mingw32\lib`
To finish this step of the copies, also copy the file: SDL2_image.dll which is in SDL2_image\x86_64-w64-mingw32\bin\SDL2_image.dll to the “root” of your project.
TIP: If you want, make a backup of this SDL2 folder that already has all the SDL2_image files somewhere else to always use them in possible new projects and save time.
Compiling
To run our example we will use this PNG image below:

Save it inside your project!
Now copy the code below and paste it inside a main.cpp file (Do not use Notepad to create it, use a code editor: VS Code, for example).
Of course, in the same place as the
SDL2folder (with the files copied from SDL2_image) and the image.
#include <SDL2/SDL.h>
#include <SDL2/SDL_image.h>

int main(int argc, char** argv) {
  SDL_Init(SDL_INIT_EVERYTHING);

  SDL_Window* window = SDL_CreateWindow(
      "SDL2 Image on Windows",
      50, 30,
      1280, 720,
      SDL_WINDOW_SHOWN
      );

  SDL_Renderer * renderer = SDL_CreateRenderer(window, -1, 0);
  SDL_Texture * img = IMG_LoadTexture(renderer, "pikachu.png");

  SDL_Rect rect, rect2;
  rect.x = 50;
  rect.y = 20;
  rect.w = 400;
  rect.h = 400;

  rect2.x = 800;
  rect2.y = 20;
  rect2.w = 300;
  rect2.h = 300;

  while(true){
    SDL_Event event;
    while(SDL_PollEvent(&event)){
      if( event.type == SDL_QUIT ){
        exit(0);
      }else if( event.type == SDL_MOUSEBUTTONDOWN ){
        rect2.x -= 20;
      }
    }

    SDL_RenderClear(renderer);
    SDL_SetRenderDrawColor(renderer, 240, 250, 50, 255);
    SDL_RenderFillRect(renderer, &rect2);
    SDL_SetRenderDrawColor(renderer, 9, 20, 33, 255);
    SDL_RenderCopy(renderer, img, NULL, &rect);
    SDL_RenderPresent(renderer);
  }

  SDL_DestroyTexture(img);
  SDL_DestroyRenderer(renderer);
  SDL_DestroyWindow(window);
  SDL_Quit();
  return 0;
}
Note that in this code we have 4 fundamental lines to read and display the image correctly, they are the lines:
// Include the SDL2_image
#include <SDL2/SDL_image.h>

// Read the image: pikachu.png
SDL_Texture * img = IMG_LoadTexture(renderer, "pikachu.png");

// Display our image
// NOTE that: the `rect` will "snap" the image
SDL_RenderCopy(renderer, img, NULL, &rect);

// Free up the space used by the image in memory
SDL_DestroyTexture(img);
Compile via command line
To compile the command is similar to what we did in the video, there is only one difference, add the flag: -lSDL2_image at the end, example:
g++ main.cpp -I SDL2\x86_64-w64-mingw32\include -L SDL2\x86_64-w64-mingw32\lib -lmingw32 -lSDL2main -lSDL2 -lSDL2_imageNow just run with the command:
a.exe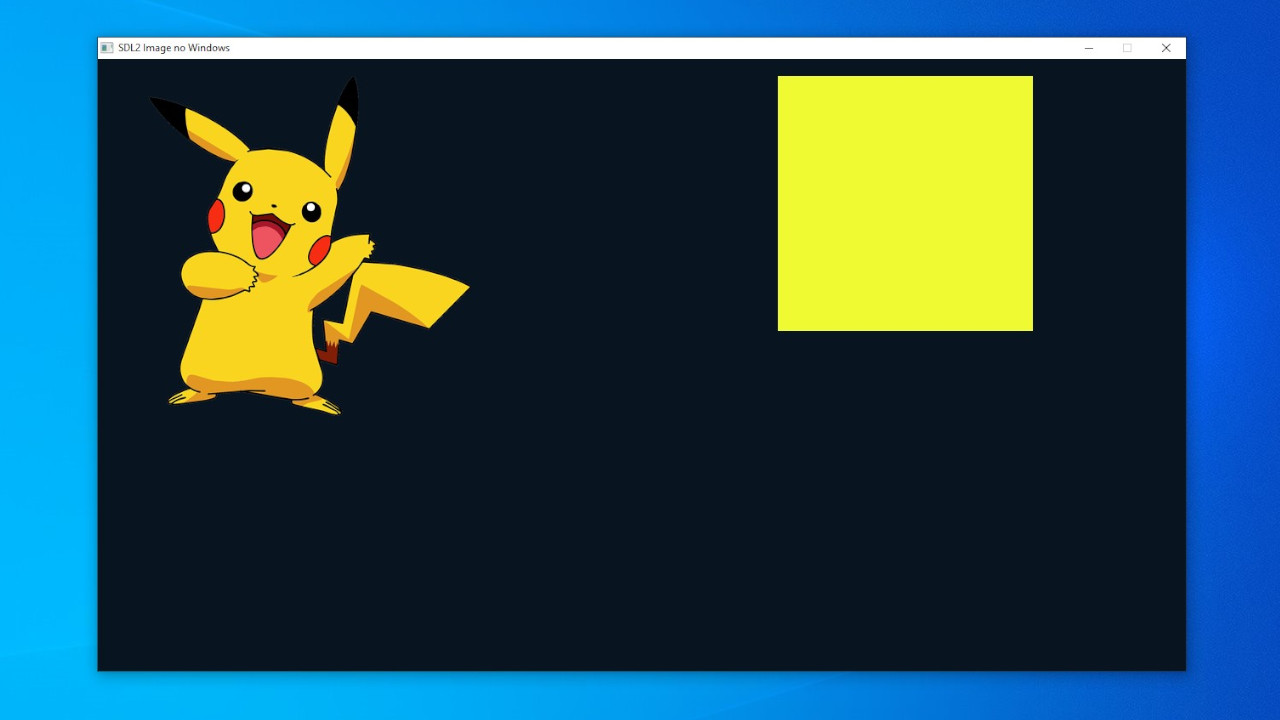
If it doesn’t work it’s because you must have ′′ skipped ′′ some step, review all of them!
Using a Makefile
To speed it up and type less when compiling, you can create a file (no extension, again don’t use Notepad) named Makefile and insert this content below:
all:
	g++ .\main.cpp -I .\SDL2\x86_64-w64-mingw32\include\ -L .\SDL2\x86_64-w64-mingw32\lib\ -lmingw32 -lSDL2main -lSDL2
Remember: A Makefile must respect the
tabsas the code is here, otherwise it won’t work.
After saving, still inside your project folder, such as PowerShell or CMD, run the command:
Also remember to have previously renamed the
mingw32-makefile to justmakein the path:C:\mingw64\bin\
makeUsing a script Lua
The cool thing about using a script from some scripting language, is that you can check if files exist and with that it helps you debug which step you forgot.
If you want to use a script: Python, Batch, … feel free!
In this example I used Lua, to find out how to install Lua on Windows see the file: How to install Lua on Windows 10(Article in Portuguese)
Create a file named build.lua still inside your project and insert the code below:
function file_exists(name)
  local f = io.open(name, "r")
  return f ~= nil and io.close(f)
end

if(file_exists("SDL2.dll")) then
  print("Compiling..")
  os.execute("g++ main.cpp -I SDL2\\x86_64-w64-mingw32\\include -L SDL2\\x86_64-w64-mingw32\\lib -lmingw32 -lSDL2main -lSDL2 -lSDL2_image")
else
  print("It needs the SDL2.dll file to compile.")
  print("To get in: SDL2\\x86_64-w64-mingw32\\bin")
  return 1
end
This script checks if you didn’t forget to copy the
SDL2.dllfile into your project, you can still improve and also include theSDL2_image.dllfile. In Lua you need to escape the backslash with another backslash, eg\\.
And to run:
lua build.luaAny questions comment on the SDL2 video on the channel: .
See too
- How to install CMake on Windows
- How to Transform Your C/C++ Games to the Web with Emscripten (SDL2)
- How to install Lua on Windows 10
- Lua Definitive Guide
- Create Games for Windows, Linux and Web with Raylib C/C++
- Learn to Create Games with Allegro C/C++ on Windows and Linux
- Learn to Create Games with C++ and SFML
- SDL2 Video for Beginners(Portuguese)