We’ve already made a video showing how to render maps for games made with C++. However, that example used TinyXML2. There’s a better alternative: tmxlite.
tmxlite is a lightweight C++ library used to load and read TMX map files (the format used by the Tiled map editor).
Features:
- Focus on efficient reading of TMX maps.
- Does not handle rendering: it only loads and interprets
.tmxdata (such as tiles, layers, objects, etc.). - Supports:
If you want to load .tmx maps into your C++ game (e.g. with SFML, SDL, OpenGL), tmxlite provides the structure to read the data, and you handle rendering and logic.
Next, we’ll see how to install, build, and run tmxlite on Windows and Ubuntu (or any GNU/Linux distro).
Installation
On Windows
First, install the following dependencies:
Windows Dependencies:
Restart the terminal (PowerShell) after installing dependencies.
To install tmxlite, run the commands below one by one or save them in a PowerShell script:
InstallTmxlite.ps1
git clone https://github.com/fallahn/tmxlite
cd .\tmxlite
meson setup build
meson compile -C build
meson install -C build --destdir "C:\tmxlite"
Copy-Item -Path '.\tmxlite\tmxlite\include' -Destination 'C:\tmxlite' -Recurse
To run the script: use PowerShell with
powershell InstallTmxlite.ps1orpwsh InstallTmxlite.ps1.
Once tmxlite is installed, you can delete the cloned repo!
Since we’ll test it with SFML and compile with GCC MinGW, you’ll need the SFML version for GCC:
- Download
SFML-2.5.1-windows-gcc-7.3.0-mingw-64-bit.zip - Extract it
- Move the folder to
C:\SFML-2.5.1-GCC(add-GCCto differentiate from the VS version)
Preparing your project:
- Create folder:
New-Item -ItemType Directory -Path 'MyProject' - Download
assets/from https://terminalroot.com/downloads/assets.zip and extract it (Extract here)
Invoke-WebRequest -Uri "https://terminalroot.com/downloads/assets.zip" -OutFile "assets.zip"If your extractor created a subfolder, move it so that assets/ is at the root:
./assets/
├── box.jpg
├── floor.jpg
└── map.tmx

0 directories, 3 files
All set. We’ll show how to compile your files later. Now let’s move on to the Ubuntu setup.
On Ubuntu
The process is similar, but you can install dependencies using APT:
sudo apt meson ninja-build build-essential git clang libsfml-dev curlNote: SFML must be version 2.x, not 3.x.
To check your SFML version:
apt list --installed | grep libsfml
grep -R "SFML_VERSION" /usr/include/SFML/
Now just clone, compile and install tmxlite:
git clone https://github.com/fallahn/tmxlite
cd tmxlite/
meson setup build
meson compile -C build
sudo meson install -C build
Installation paths ↓
Dropping privileges to "$USER" before running ninja...
ninja: Entering directory `./tmxlite/build'
ninja: no work to do.
Installing tmxlite/src/libtmxlite.so to /usr/local/lib/x86_64-linux-gnu
Then copy the includes (there’s another tmxlite folder inside):
sudo cp -r tmxlite/include/tmxlite /usr/local/include/
sudo ldconfig # Otional
To check the installed tmxlite version:
curl \
  https://raw.githubusercontent.com/fallahn/tmxlite/refs/heads/master/meson.build \
  2>/dev/null | \
  grep ' version:'
Also create your project with: mkdir MyProject, download assets/ from https://terminalroot.com/downloads/assets.zip and extract (Extract here). Make sure it looks like this (no subfolder):
./assets/
├── box.jpg
├── floor.jpg
└── map.tmx

0 directories, 3 files
Let’s now dive into the tmxlite tutorial!
How to Use tmxlite
Inside your MyProject (on both Windows and GNU/Linux), create a main.cpp file with basic SFML setup:
For more details, check out our course: https://terminalroot.com.br/sfml
#include <SFML/Graphics.hpp>
#include <iostream>

int main(){
  sf::RenderWindow window(sf::VideoMode(1280,720), "SFML::Tmxlite");

  while(window.isOpen()){
    sf::Event event;
    while(window.pollEvent(event)){
      if(event.type == sf::Event::Closed){
        window.close();
      }
    }

    window.clear();
    window.display();
  }

  return EXIT_SUCCESS;
}
Now let’s add tmxlite code.
01. Include tmxlite headers:
#include <tmxlite/Map.hpp>
#include <tmxlite/Layer.hpp>
#include <tmxlite/TileLayer.hpp>
#include <tmxlite/ObjectGroup.hpp>
02. Create the map object and load ./assets/map.tmx
Place it just below
RenderWindow.
This map.tmx was created with Tiled Map Editor
tmx::Map map;
if(!map.load("./assets/map.tmx")){
  std::cerr << "Failed to load TMX map.\n";
  return -1;
}
Tiled Map creation screenshots:
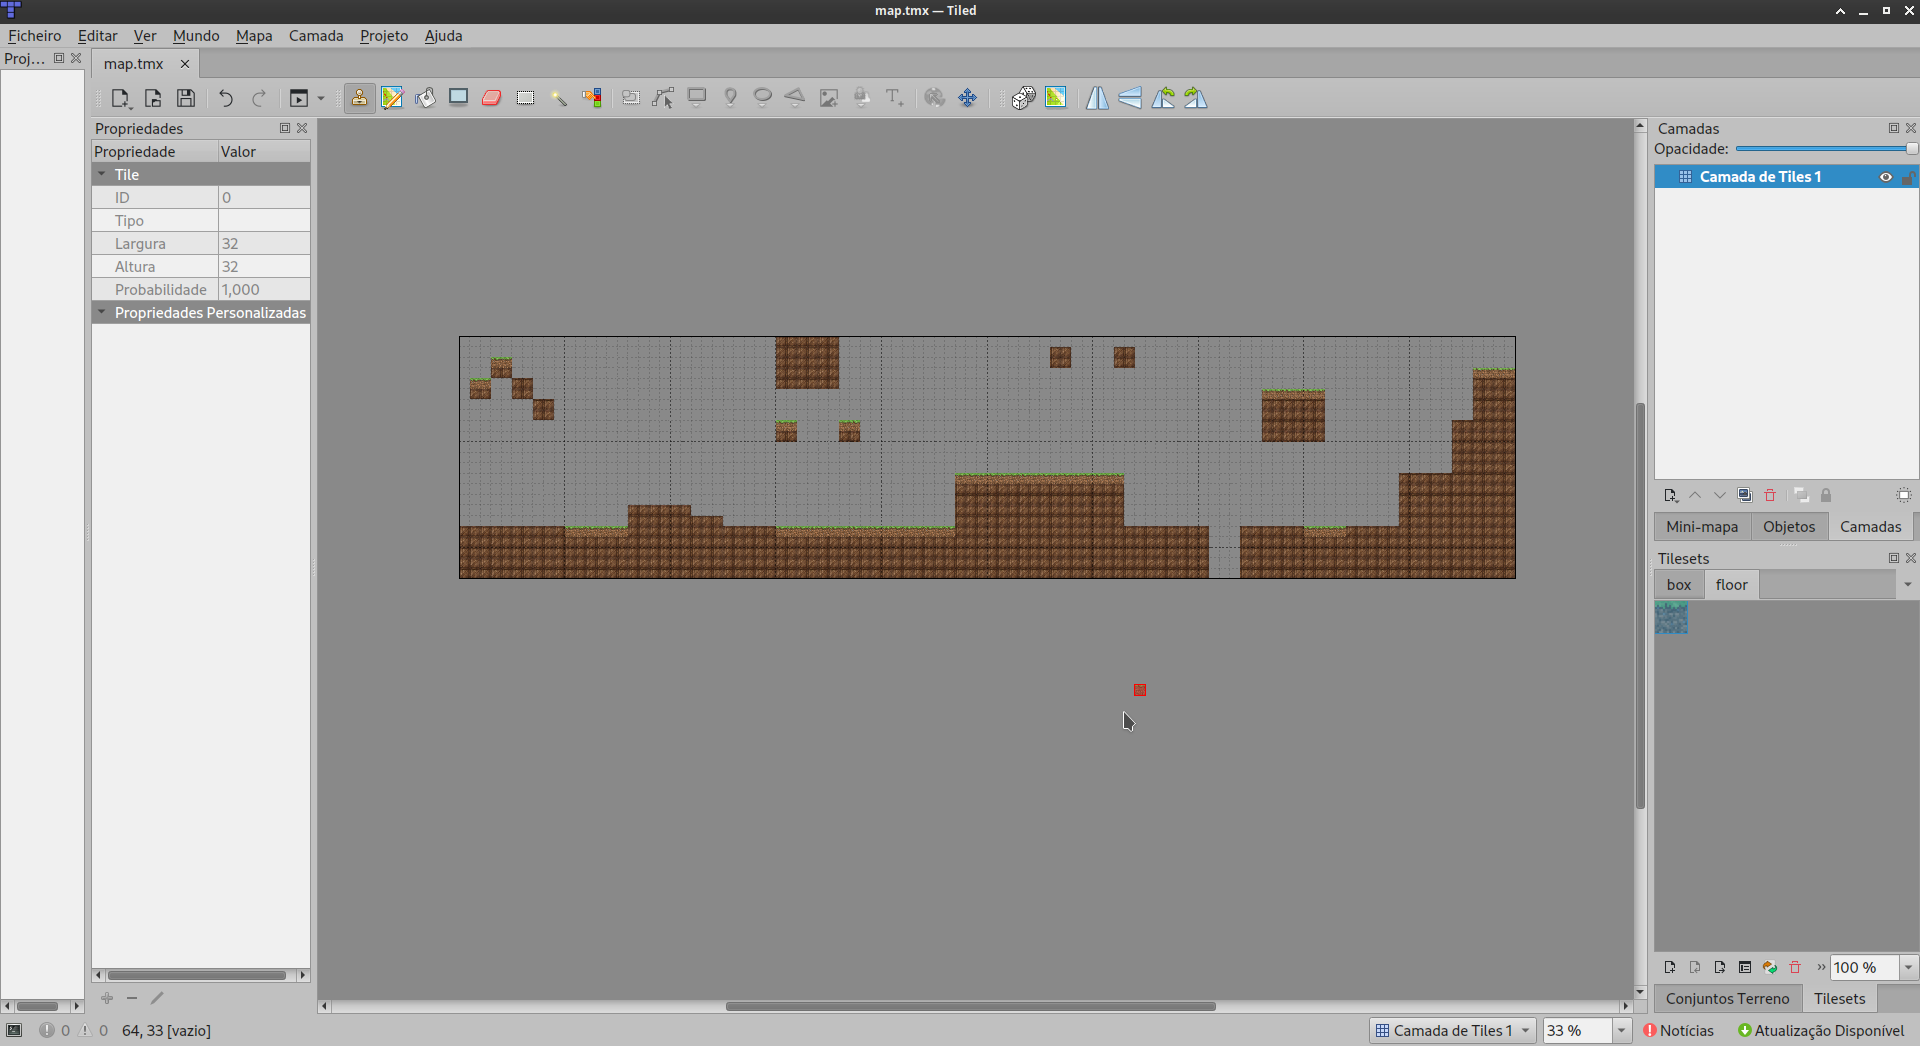
Creating a simple map
03. Get map width and height into constants:
const float map_width = static_cast<float>(map.getTileCount().x * map.getTileSize().x);
const float map_height = static_cast<float>(map.getTileCount().y * map.getTileSize().y);
04. Create a vector of tmx::Layer that can hold:
Layer::Type::Tile,Layer::Type::Object,Layer::Type::Image, orLayer::Type::Group
const auto& layers = map.getLayers();05. Load separate images as textures and create a Sprite:
sf::Texture floor_tex, box_tex;
if(!floor_tex.loadFromFile("./assets/floor.jpg") || !box_tex.loadFromFile("./assets/box.jpg")){
  std::cerr << "Failed to load images for tiles.\n";
  return -1;
}

sf::Sprite tile_sprite;
06. Draw tiles from each Tile layer
Replace window.clear() with:
window.clear(sf::Color(138, 138, 138));

for (const auto& layer : layers) {
  if (layer->getType() == tmx::Layer::Type::Tile) {
    auto* tile_layer = dynamic_cast<const tmx::TileLayer*>(layer.get());
    const auto& tiles = tile_layer->getTiles();
    const auto layer_size = tile_layer->getSize();
    const auto tile_size = map.getTileSize();

    for (std::size_t y = 0; y < layer_size.y; ++y) {
      for (std::size_t x = 0; x < layer_size.x; ++x) {
        std::size_t index = x + y * layer_size.x;
        std::uint32_t tile_id = tiles[index].ID;

        if (tile_id == 0){
          continue;
        }

        if(tile_id == 1){
          tile_sprite.setTexture(box_tex);
        }else if(tile_id == 2){
          tile_sprite.setTexture(floor_tex);
        }else{
          continue;
        }

        tile_sprite.setPosition(static_cast<float>(x * tile_size.x), static_cast<float>(y * tile_size.y));
        window.draw(tile_sprite);
      }
    }
  }
}
That’s it — the most basic tmxlite setup. Full version:
main.cpp
#include <SFML/Graphics.hpp>
#include <iostream>
#include <tmxlite/Map.hpp>
#include <tmxlite/Layer.hpp>
#include <tmxlite/TileLayer.hpp>
#include <tmxlite/ObjectGroup.hpp>

int main(){
  sf::RenderWindow window(sf::VideoMode(1280,720), "SFML::Tmxlite");

  tmx::Map map;
  if(!map.load("./assets/map.tmx")){
    std::cerr << "Failed to load TMX map.\n";
    return -1;
  }

  const float map_width = static_cast<float>(map.getTileCount().x * map.getTileSize().x);
  const float map_height = static_cast<float>(map.getTileCount().y * map.getTileSize().y);

  const auto& layers = map.getLayers();

  sf::Texture floor_tex, box_tex;
  if(!floor_tex.loadFromFile("./assets/floor.jpg") || !box_tex.loadFromFile("./assets/box.jpg")){
    std::cerr << "Failed to load images for tiles.\n";
    return -1;
  }

  sf::Sprite tile_sprite;

  while(window.isOpen()){
    sf::Event event;
    while(window.pollEvent(event)){
      if(event.type == sf::Event::Closed){
        window.close();
      }
    }

    window.clear(sf::Color(138, 138, 138));

    for (const auto& layer : layers) {
      if (layer->getType() == tmx::Layer::Type::Tile) {
        auto* tile_layer = dynamic_cast<const tmx::TileLayer*>(layer.get());
        const auto& tiles = tile_layer->getTiles();
        const auto layer_size = tile_layer->getSize();
        const auto tile_size = map.getTileSize();

        for (std::size_t y = 0; y < layer_size.y; ++y) {
          for (std::size_t x = 0; x < layer_size.x; ++x) {
            std::size_t index = x + y * layer_size.x;
            std::uint32_t tile_id = tiles[index].ID;

            if (tile_id == 0){
              continue;
            }

            if(tile_id == 1){
              tile_sprite.setTexture(box_tex);
            }else if(tile_id == 2){
              tile_sprite.setTexture(floor_tex);
            }else{
              continue;
            }

            tile_sprite.setPosition(static_cast<float>(x * tile_size.x), static_cast<float>(y * tile_size.y));
            window.draw(tile_sprite);
          }
        }
      }
    }

    window.display();
  }

  return EXIT_SUCCESS;
}
Now let’s build and run on Windows and Linux.
Build and Run
On Windows
Create a PowerShell script: build.ps1 and paste the following:
This script copies
.dlls, links thelib, and includesincludedirectories from SFML and tmxlite.
if ($args[0] -eq "--prepare") {
Write-Output "Running preparation..."
Copy-Item -Path "C:\SFML-2.5.1-GCC\bin\*.dll" -Destination .
Copy-Item -Path "C:\tmxlite\bin\*.dll" -Destination .
g++ .\main.cpp -I C:\SFML-2.5.1-GCC\include\ -L C:\SFML-2.5.1-GCC\lib\ -I C:\tmxlite\include -L C:\tmxlite\lib -lsfml-main -lsfml-graphics -lsfml-system -lsfml-window -ltmxlite
.\a.exe
} else {
if (Test-Path ".\libtmxlite.dll") {
Write-Output "Compiling..."
g++ .\main.cpp -I C:\SFML-2.5.1-GCC\include\ -L C:\SFML-2.5.1-GCC\lib\ -I C:\tmxlite\include -L C:\tmxlite\lib -lsfml-main -lsfml-graphics -lsfml-system -lsfml-window -ltmxlite
.\a.exe
} else {
Write-Output ""
Write-Output "Use: pwsh build.ps1 --prepare"
Write-Output ""
}
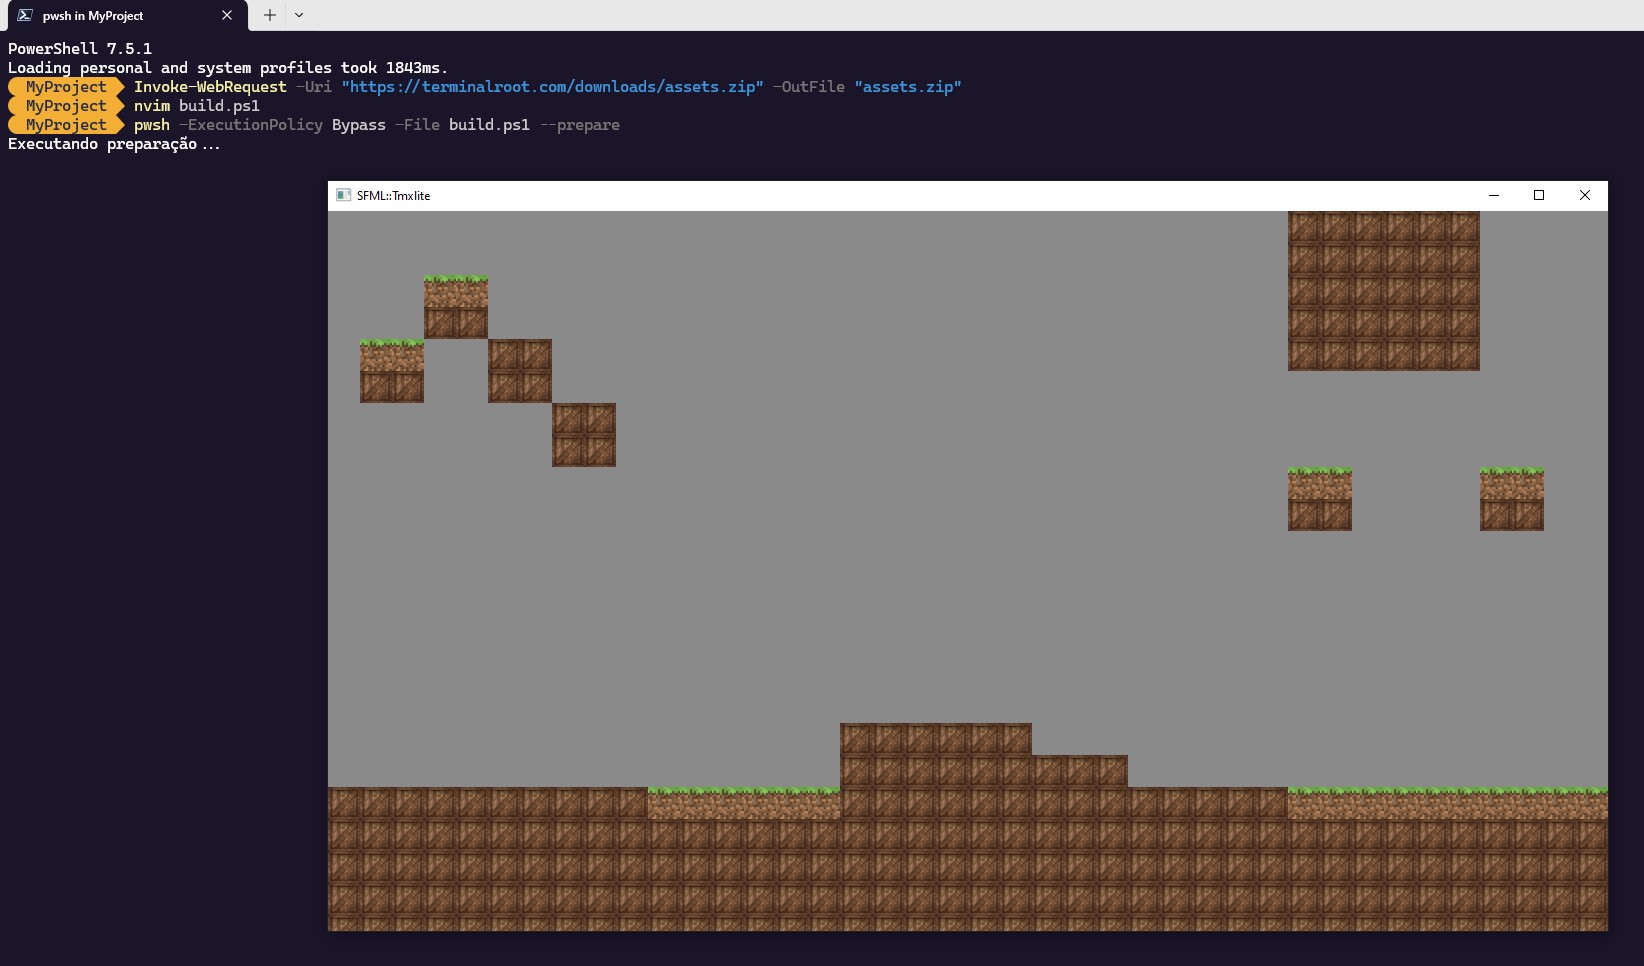
}You need to run with --prepare first (to copy files), then compile:
PowerShell example:
pwsh build.ps1 --prepareWindows PowerShell example:
powershell build.ps1 --prepareIf Windows Defender blocks execution:
# Windows PowerShell:
powershell -ExecutionPolicy Bypass -File build.ps1 --prepare

# PowerShell
pwsh -ExecutionPolicy Bypass -File build.ps1 --prepare
After building, it will auto-run. If not, run manually:
.\a.exeThis window should appear:
On GNU/Linux Distros (Ubuntu)
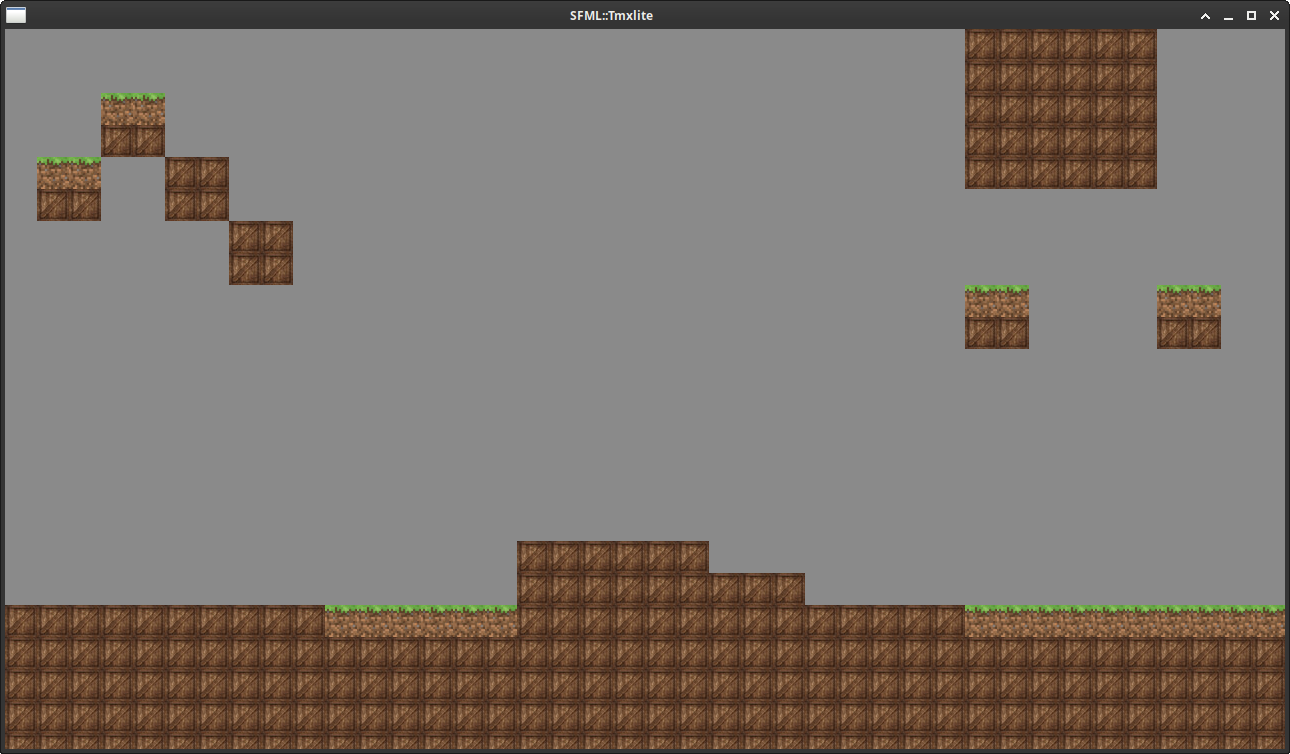
Compile using required flags: -lsfml-graphics -lsfml-window -lsfml-system -ltmxlite:
g++ main.cpp -lsfml-graphics -lsfml-window -lsfml-system -ltmxliteThen run the generated binary:
./a.outIt will display the same as on Windows:
Adding a Camera
Since the map is 3200×736 pixels and the window is 1280 wide, I created a camera so you can see the whole scene. You don’t need to recompile after editing the map in Tiled.
To apply the camera patch:
- 1. Create a file
camera.patchwith this content:
29a30,40
>   sf::RectangleShape player(sf::Vector2f(64.f, 64.f));
>   player.setFillColor(sf::Color::Red);
>
>   float player_x = 10.f;
>   float player_y = 512.f;
>   player.setPosition(player_x, player_y);
>
>   float player_speed = 300.f;
>   sf::Clock clock;
>
>
37a49,67
>     float dt = clock.restart().asSeconds();
>
>     if(sf::Keyboard::isKeyPressed(sf::Keyboard::Right)){
>       player_x += player_speed * dt;
>     }else if(sf::Keyboard::isKeyPressed(sf::Keyboard::Left)){
>       player_x -= player_speed * dt;
>     }
>
>     if(player_x < 0.f) player_x = 0.f;
>     if(player_x > map_width - player.getSize().x) player_x = map_width - player.getSize().x;
>
>     float view_offset_x = player_x + player.getSize().x / 2.f - window.getSize().x / 2.f;
>
>     if(view_offset_x < 0.f) view_offset_x = 0.f;
>     if(view_offset_x > map_width - window.getSize().x)
>       view_offset_x = map_width - window.getSize().x;
>
>     player.setPosition(player_x - view_offset_x, player_y);
>
64c94,99
<             tile_sprite.setPosition(static_cast<float>(x * tile_size.x), static_cast<float>(y * tile_size.y));
---
>             float draw_x = static_cast<float>(x * tile_size.x) - view_offset_x;
>             float draw_y = static_cast<float>(y * tile_size.y);
>
>             tile_sprite.setPosition(draw_x, draw_y);
>
> window.draw(player);- 2. Apply it:
patch main.cpp camera.patchOn Windows, install the patch command via Git Bash
After recompiling, it should look like this (red block simulates the Player):
Object-Oriented Version with ECS
For game development, Object-Oriented Programming and ECS are highly recommended. ECS may be optional for smaller projects, but OOP is always helpful.
You can organize your code however you like. I usually follow this video structure. For large projects, ECS is ideal.
I made an ECS version to show how tmxlite fits nicely in such structures.
ECS structure:
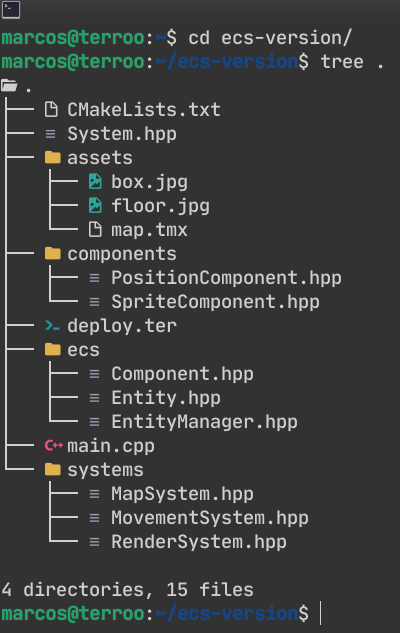
System.hppis unused but provided if you want to implement it.
To test it, download the .zip from https://terminalroot.com/downloads/ecs.zip, extract it, build with CMake, and run.
Example:
wget -q https://terminalroot.com/downloads/ecs.zip
unzip ecs.zip -d ecs
cd ecs
cmake . -B build
cmake --build build
./build/ECS_Tilemap
This version already includes the camera.
On Windows, install CMake, set up Clang, and build with cmake -g "Unix Makefiles" in the terminal, or omit the flag for MSVC builds.
This article is long because it’s part of the documentation for a game I’m developing. I had to redo sprites, maps… It’s still just a draft, but here’s an early idea. Made entirely from scratch: